Technical Details
I acquired my first Pro Allp Tech from Dalloz Fall Protection in
September 2000, and a second one from Paul Hugill in 2007. The Pro Allp Tech is an updated model of the Troll
Alp.
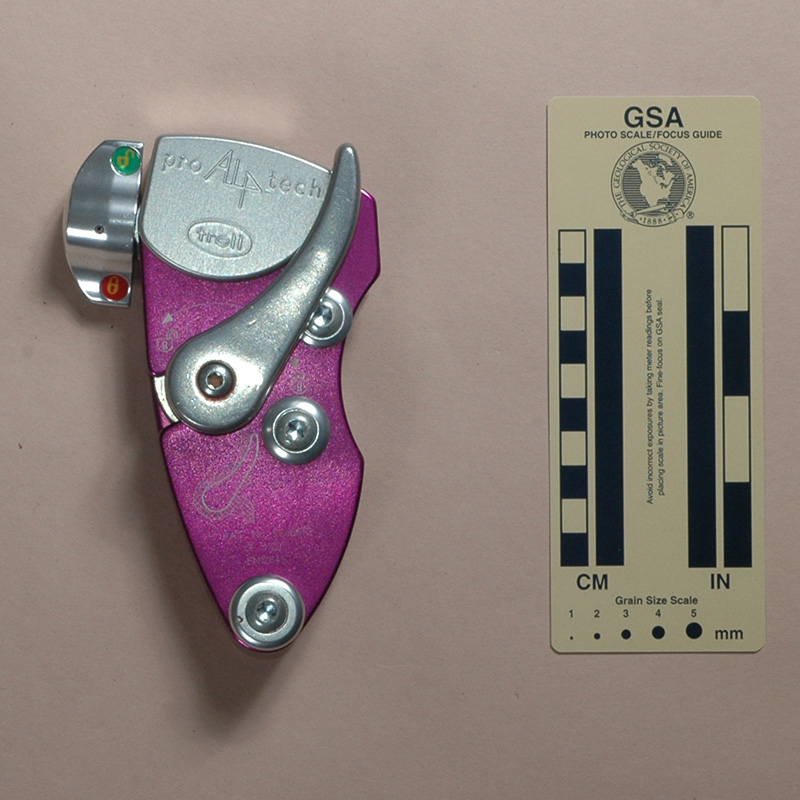
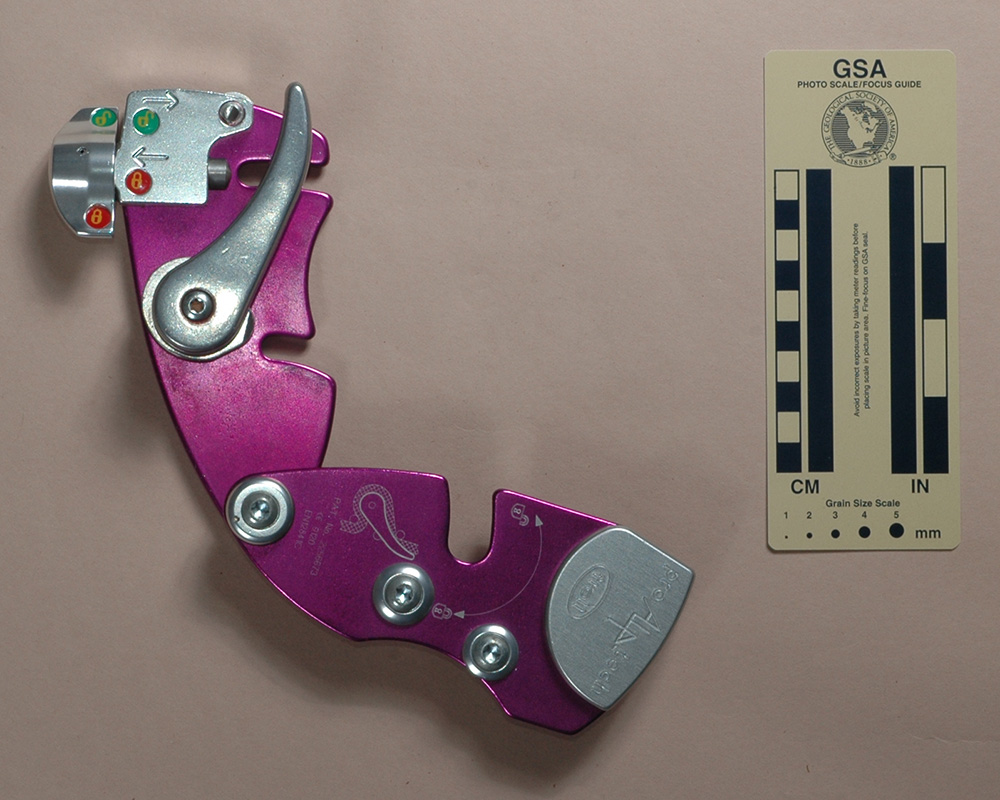
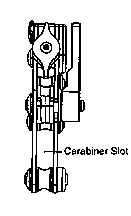
 The Pro
Allp Tech consists of four bollards, mounted between two side
plates that pivot on a fifth attachment post. The #2 bollard has
an integral braking nose. This bollard naturally rotates so that
the nose stops the rappel. An autolock handle controls the cam
so that one can descend. A screw control assembly helps vary the
friction in the device.
The Pro
Allp Tech consists of four bollards, mounted between two side
plates that pivot on a fifth attachment post. The #2 bollard has
an integral braking nose. This bollard naturally rotates so that
the nose stops the rappel. An autolock handle controls the cam
so that one can descend. A screw control assembly helps vary the
friction in the device.
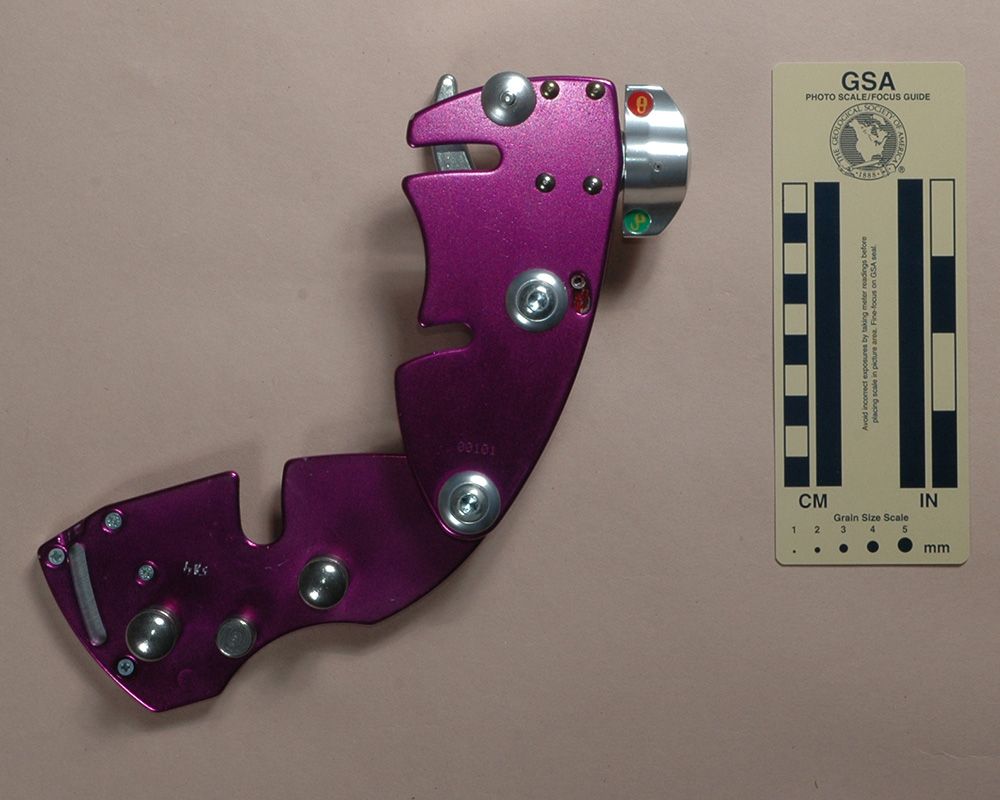
 Each
side plate is a roughly triangular piece of red anodized 1/8-in
(4.2 mm.) 7075-T6 aluminum. The plates are 145 mm. high
with a curved top and sides, with various cutouts in the sides.
Each plate is 69 mm. wide at the top and tapers in an irregular
manner to join a 22 mm. diameter circular arc at the bottom.
The side plates are attached to a 17.5 mm. diameter grooved
stainless-steel attachment post at the center of the bottom circular
arc. The rear plate is tightly bolted to the post, while the front
plate is loosely bolted so that it can rotate open. A spring acts
to close the front plate. The front plate has a large aluminum
logo plate mounted on the top front. The distance between the
side plates is 15 mm.
Each
side plate is a roughly triangular piece of red anodized 1/8-in
(4.2 mm.) 7075-T6 aluminum. The plates are 145 mm. high
with a curved top and sides, with various cutouts in the sides.
Each plate is 69 mm. wide at the top and tapers in an irregular
manner to join a 22 mm. diameter circular arc at the bottom.
The side plates are attached to a 17.5 mm. diameter grooved
stainless-steel attachment post at the center of the bottom circular
arc. The rear plate is tightly bolted to the post, while the front
plate is loosely bolted so that it can rotate open. A spring acts
to close the front plate. The front plate has a large aluminum
logo plate mounted on the top front. The distance between the
side plates is 15 mm.
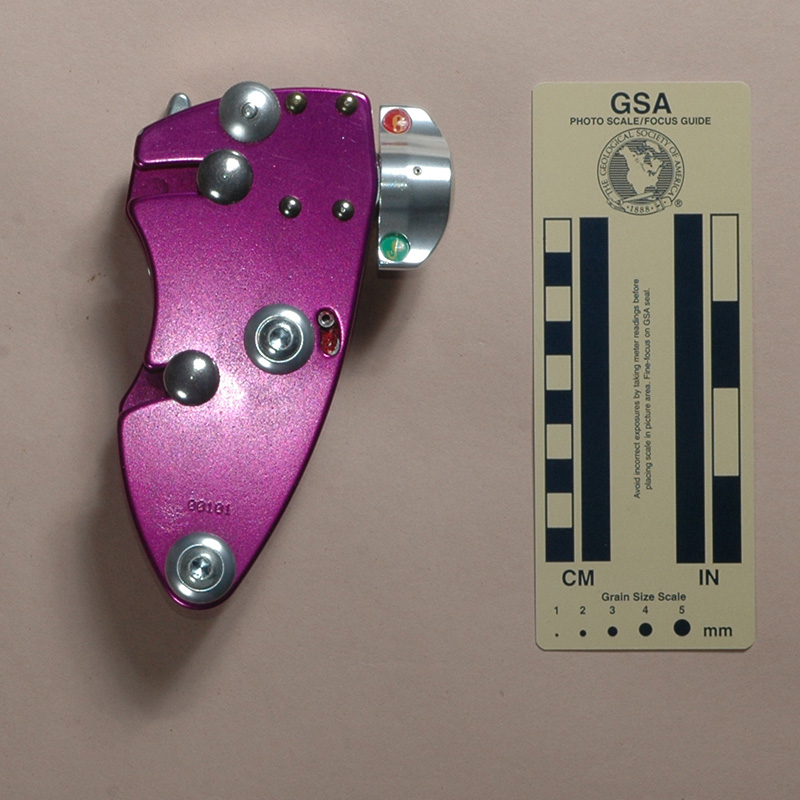
The #3 and #4 bollards are bolted to the front plate with torx
socket round-head bolts. The #1 bollard is also fixed to the front
plate, but the logo plate covers the attachment bolt. The rope
runs around the #1 and #3 bollard, while the #4 bollard is a passive
rope guide. These bollards do not rotate, but there are no visible
pins preventing the rotation. The bollards are stainless steel.
The #1 and #3 bollards each have a groove that fits into a corresponding
notch in the rear side plate. The #4 bollard is shorter and does
not extend into the rear plate. The #1 bollard diameter is 12.5 mm
in the center, and widens to 16.2 mm. about 1 mm. from
the side plate, then remains constant. The #3 bollard has similar
dimensions, while the corresponding diameters for the #4 bollard
are 10 mm. and 12.8 mm., respectively.
The #2 bollard is not circular. Viewed from the front, there
is a rope groove from the 2-o’clock position counter-clockwise
to 2-o’clock. The radius at the center of rope groove is about
13.8 mm. at 2-o’clock, increases to 17.3 mm. at 11-o’clock,
decreases to 15 mm. at 7-o’clock, then increases to 15.2 mm.
at 6-o’clock. The braking nose is at 4-o’clock and has a radius
of 17.7 mm. The #2 bollard can rotate through about 30°;
the rotation is limited by a roll pin that moves in a slot milled
in the rear plate. A hidden spring (assisted by rope friction)
rotates the #2 bollard clockwise so that the nose presses the
rope into the #3 bollard to increase friction. A spring-loaded
autolock handle mounted on the #2 bollard swings to the 8-o’clock
position without action, then begins to turn the #2 bollard to
decrease friction.
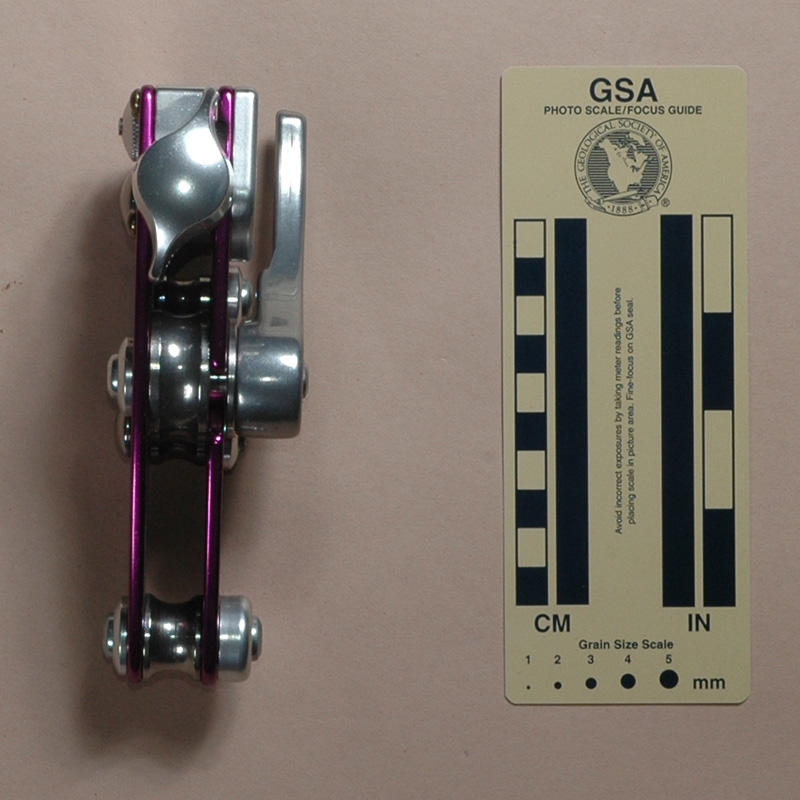
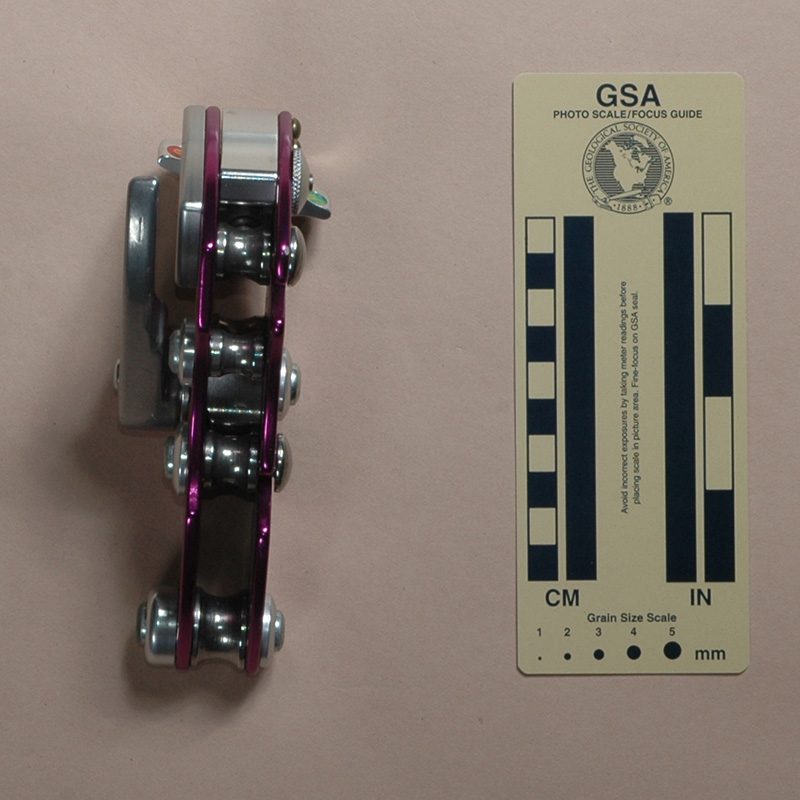
 The four
bollards are mounted 118 mm., 61.5 mm., 42 mm. and
86.5 mm. from the center of the pivot point. When the rope
is inserted, this asymmetrical arrangement ensures that the rope
is pinched between the #2 and #3 bollards only.
The four
bollards are mounted 118 mm., 61.5 mm., 42 mm. and
86.5 mm. from the center of the pivot point. When the rope
is inserted, this asymmetrical arrangement ensures that the rope
is pinched between the #2 and #3 bollards only.
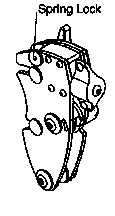
The rear plate has an aluminum block riveted (four rivets)
to the upper left inside of the plate. A 10 mm. threaded
rod (with about 11 left-hand threads per centimeter) passes through
this plate and presses against the upper bollard. A milled cross
piece is pinned to the other end of the rod, making it much like
a wing nut. Turning the nut extends the rod so that it pushes
against the top bollard. This causes the front plate to open,
and increases the distance between the #2 bollard and the#3 bollards,
thereby decreasing friction (the rope is squeezed less). There
is a spring-loaded pin (spring lock) mounted on the back of the
block. The pin extends through the rear plate to a knurled knob.
The other end engages a slot in the front plate. Pulling in the
knurled knob the pin allows one to open the Pro Allp Tech.
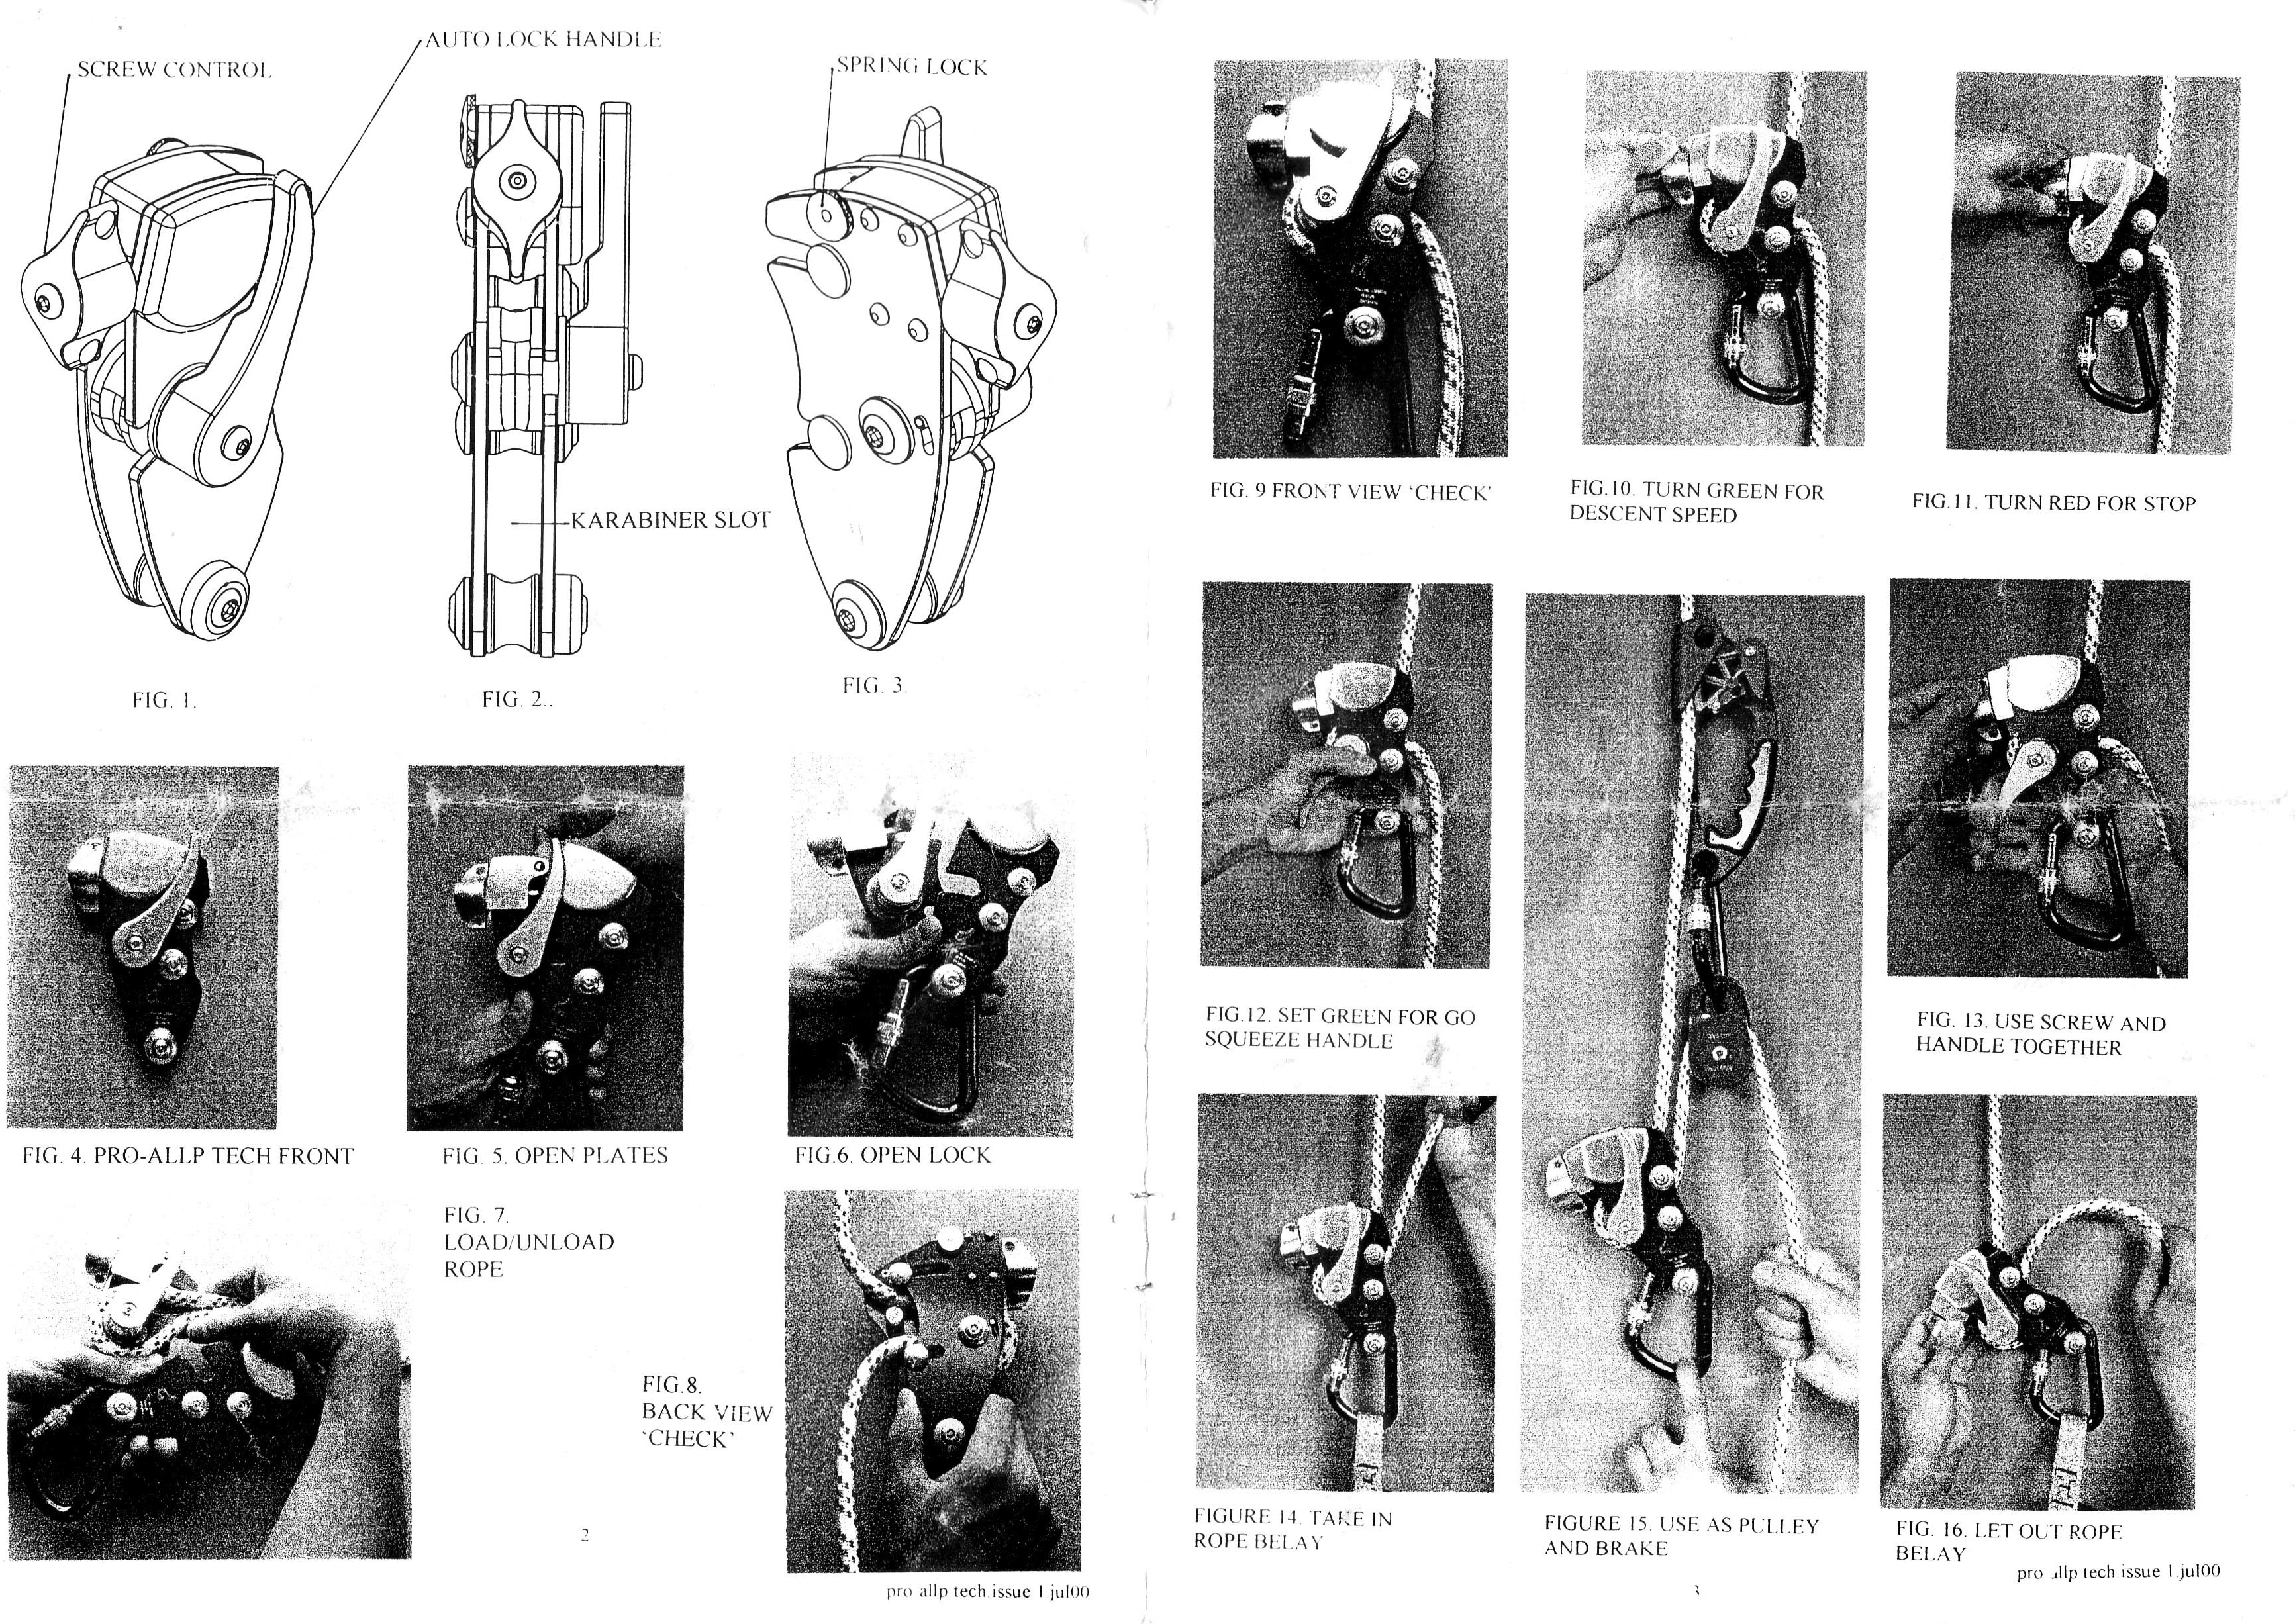
The front plate has two illustrations: a rigging illustration
and an arc with double arrowheads plus open and closed locks indicating
how to use the autolock lever. The front plate also bears the
text "PAT No. 2256673," "CE 0120" and "EN12841C."
The logo plate is stamped with "Pro Allp Tech" (with
Allp being stylized) and "Troll" in an ellipse. The
rear plate is stamped "00101" (the serial number). The
ends of the wing nut are painted to indicate which direction to
turn: a white open lock on a green background to open (decreasing
friction), and a white closed lock on a red background to close
(increasing friction). The block is marked in the same manner,
and is also stamped with two arrows to indicate which way to turn
the nut.
The Pro Allp Tech is beautifully made - I've seen very few
rappel devices that are so nicely manufactured. My photographs
don't do the Pro Allp Tech justice - the flash greatly exaggerates
unevenness in the finish, to the naked eye this is barely noticeable.
There are no sharp edges on the Pro Allp Tech - everything is
nicely rounded.
The instructions state that the Pro Allp Tech was tested to
prEN12841 using new Troll 11 mm. x 32 Platt Rescue and Intervention rope and Cousin 10.5 mm.,
11 mm. x 16 Platt and 12.5 mm. x 20 Platt low stretch ropes. low
stretch nylon rope. None of these ropes were readily available
here, but the Pro Allp Tech seems to function quite well on common
caving and climbing ropes in the 9 mm. to 13 mm. size
range. Obviously, it is faster on smaller ropes. When the rod
is unscrewed, there is enough friction to hold me in place on
all of these ropes. As the rod is tightened, the friction is gradually
reduced. The transition is slow enough that it is easy to maintain
control with the braking hand. The rod turns easily, without any
sensation of having to force it. This time there was no surprise,
after using the Troll (USA) Alp
I expected the Pro Allp Tech to work well, and it does.
Getting used to the left-hand thread was no problem. The Pro
Allp Tech is designed for the traditional right-handed user who
brakes with their right hand at the right hip. Although I'm right-handed,
I prefer to brake left-handed, so I’d rather have a mirror-image
version, although this hardly is significant enough to be worth
worrying about.
One should understand that part of the friction is obtained
by squeezing the rope between the center and bottom bollard. As
one turns the rod counter-clockwise, it forces the rear plate
in the direction that separates the center and lower bollard,
reducing the rope squeezing action. The friction decreases accordingly.
This process only continues until there is no more squeezing.
After that, there is very little change in friction. This is rather
obvious, because there is no large change in the snubbing angle
once the bollards are separated. The practical effect is that
if one starts a rappel with the rod screwed in and finds out that
the friction is insufficient, it will take many turns before the
friction is significantly increased. One should always start with
the rod unscrewed as far as practicable for the conditions. The
autolock lever should not be used to control friction, instead,
open in the entire way to descend. If the rappel is not fast enough,
release the autolock lever and stop, then adjust the wing nut
with the same hand. This way there is no temptation to remove
the braking hand from the rope.
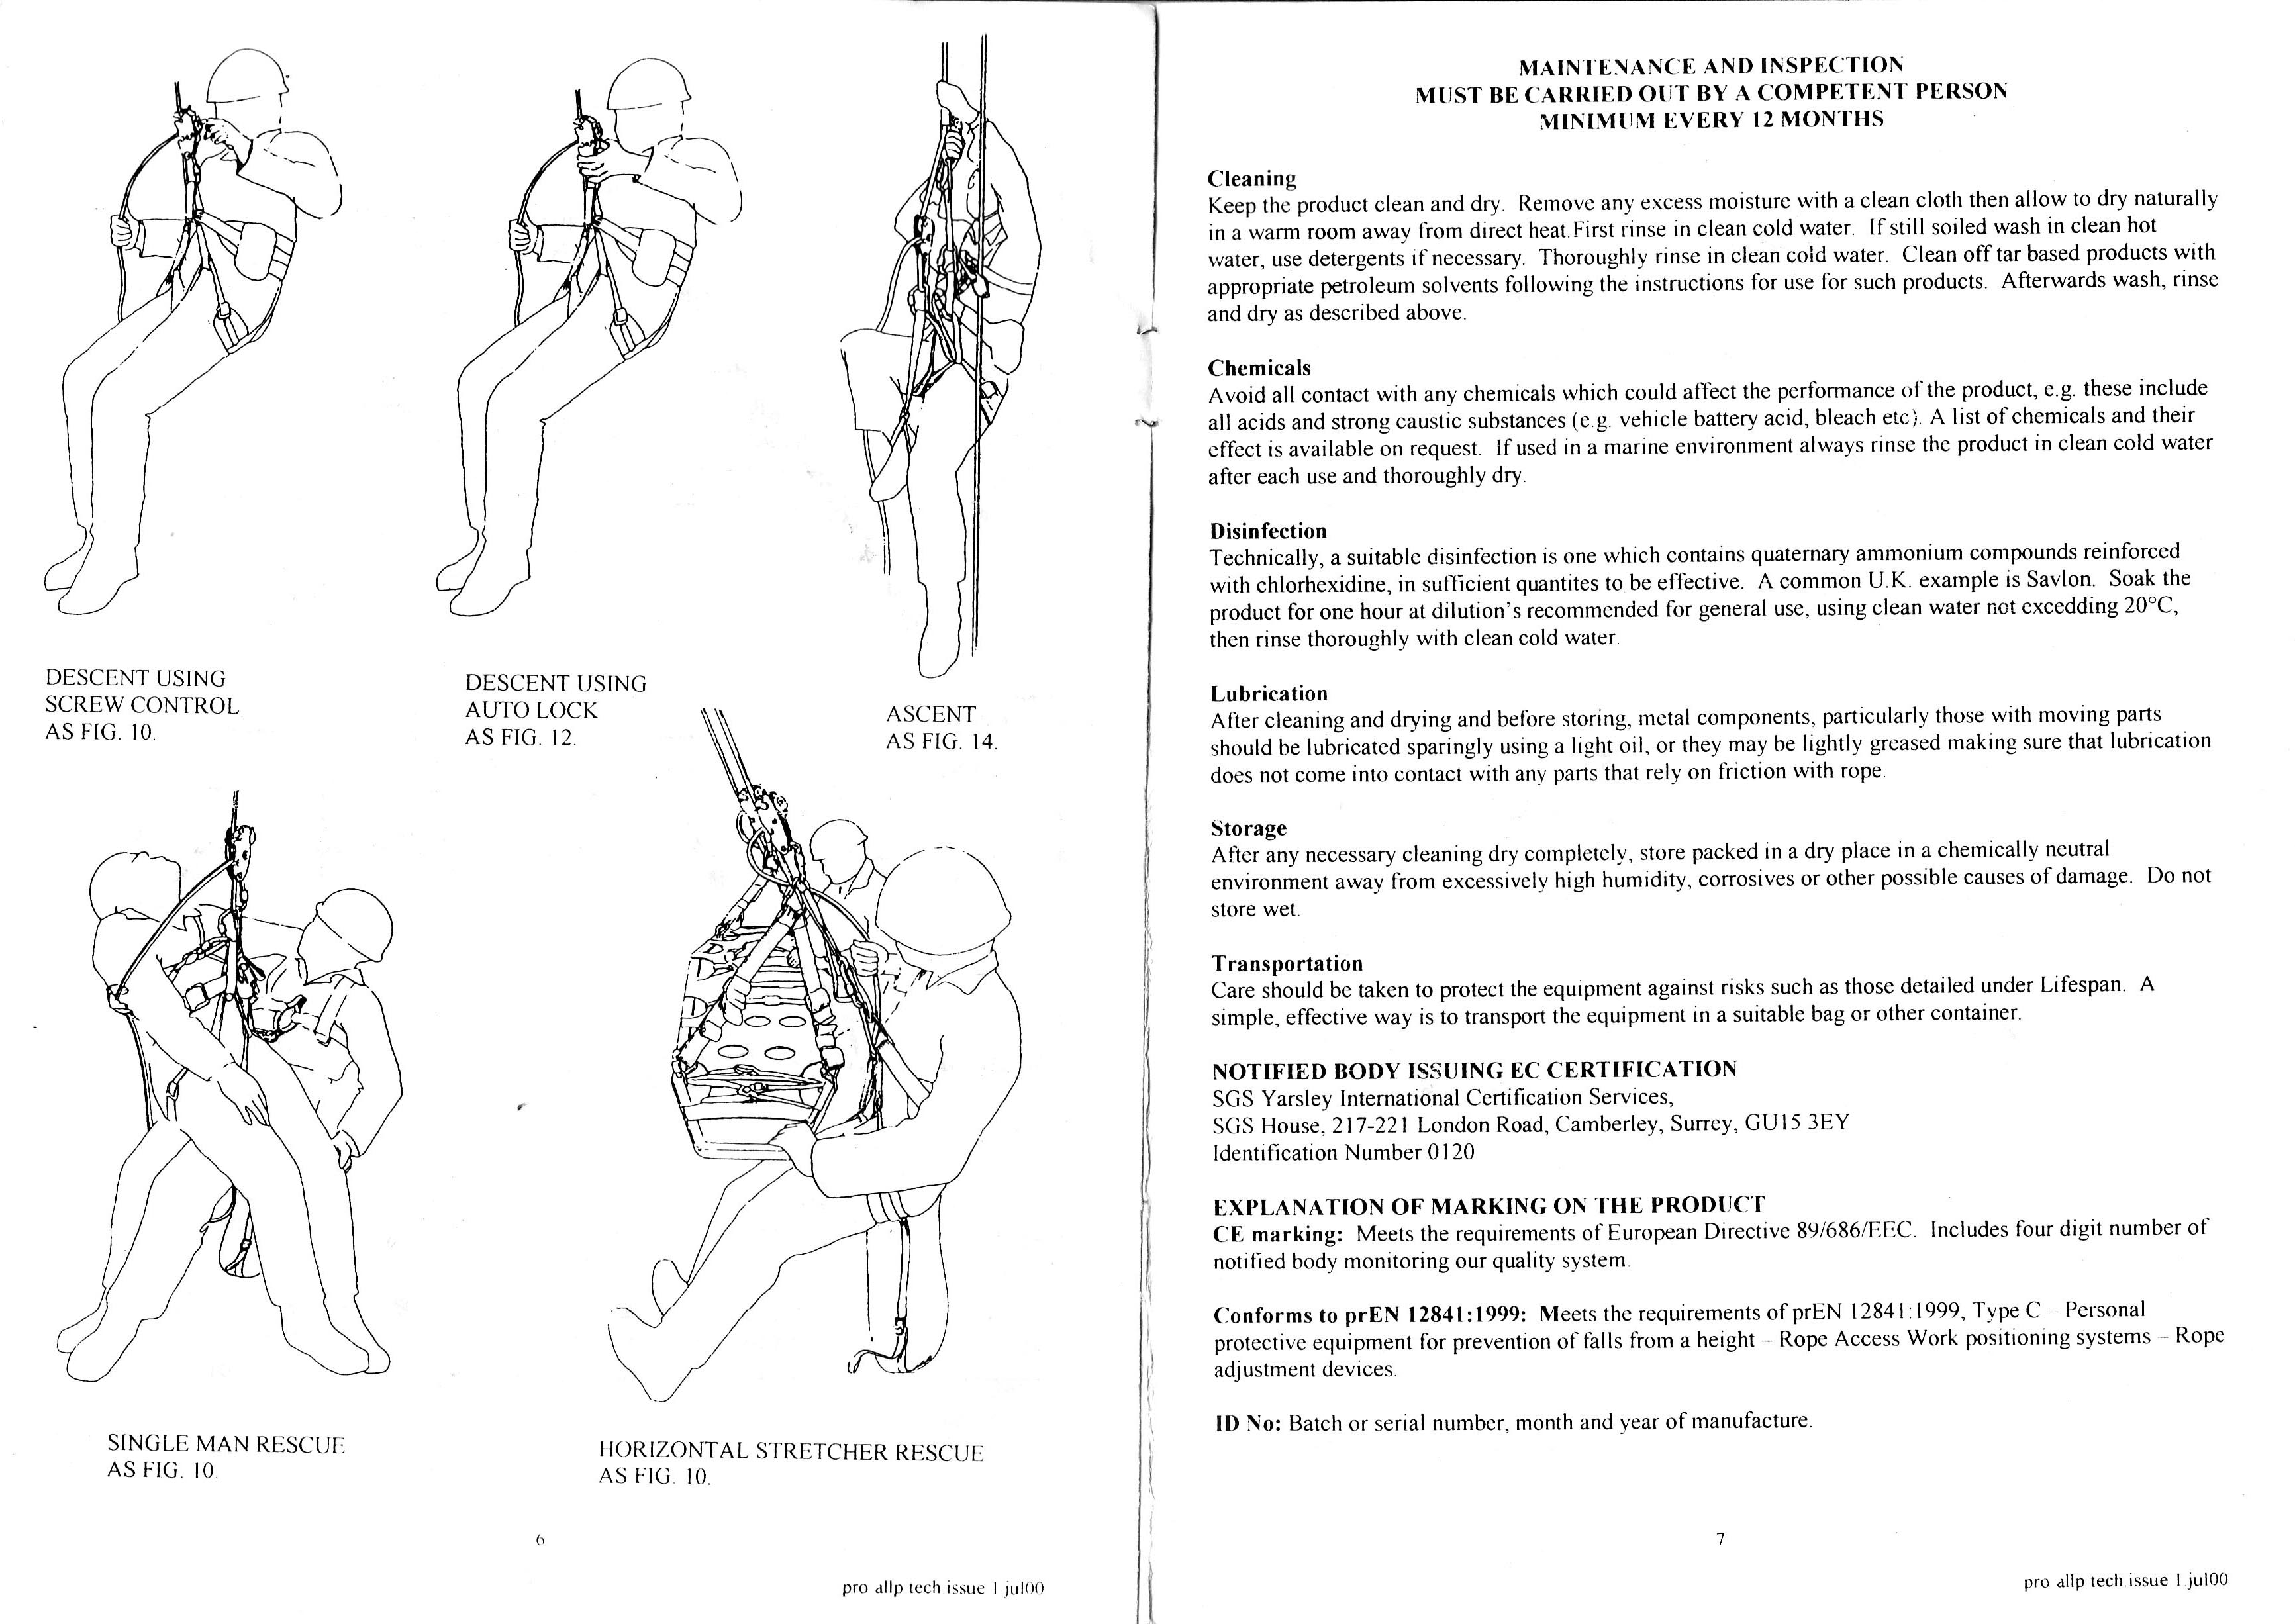
The instruction sheet shows how to use the Pro Allp Tech as
a secondary (emergency?) ascender. I wouldn't want to try this,
not because it wouldn't work, but because it would be too much
work compared to simpler options.
The Pro Allp Tech has an almost ideal shape for packing, and
it doesn't even have the rod to get in the way like the Troll
Allp has.
I'm quite impressed by the Pro Allp Tech, and for its intended
use, it deserves two stars: